[모던 자바스크립트 Deep Dive]39장 DOM
- HTML 문서의 계층적 구조와 정보를 표현하며 이를 제어할 수 있는 API, 즉 프로퍼티와 메서드를 제공하는 트리 자료구조
39.1 노드
39.1.1 HTML 요소와 노드 객체
- HTML 요소(HTML element)
- HTML 문서를 구성하는 개별적인 요소
- 노드 객체
- HTML 요소를 렌더링 엔진이 파싱하여 변환된 DOM을 구성하는 요소 노드 객체
- 어트리뷰트 → 어트리뷰트 노드로 변환
- HTML 요소의 텍스트 콘텐츠 → 텍스트 노드로 변환
- DOM 또는 DOM 트리: 노드 객체들로 구성된 트리 자료구조
- HTML 요소를 렌더링 엔진이 파싱하여 변환된 DOM을 구성하는 요소 노드 객체
39.1.2 노트 객체의 타입
- 노트 객체에는 총 12개의 노드 타입이 존재한다.
문서 노드(document node)
- DOM 트리 최상위에 존재하는 루트 노드
document객체를 가리킨다.
document객체- 브라우저가 렌더링한 HTML 문서의 전체를 가리키는 객체
- 전역 객체
window의document프로퍼티에 바인딩됨 - 따라서 문서 노드는
window.document또는document로 참조 가능 - HTML 문서당 유일하게 존재
- 분리된 자바스크립트라도 하나의 전역 객체
window를 공유 ⇒ 모든 자바스크립트 코드는 하나의document객체를 바라봄
- 분리된 자바스크립트라도 하나의 전역 객체
- DOM 트리의 노드에 접근하기 위한 진입점(entry point) 역할 담담
요소 노드(element node)
- HTML 요소를 가리키는 객체
- HTML 요소 간 중첩에 의해 부자 관계를 맺고 정보를 구조화 ⇒ 문서의 구조를 표현
어트리뷰트 노드(attribute node)
- HTML 요소의 어트리뷰트를 가리키는 객체
- 어트리뷰트가 지정된 HTML 요소의 요소 노드와 연결
⇒ 부모 노드와 연결되지 않고 요소 노드에만 연결
⇒ 어트리뷰트 노드는 부모 노드가 없으며 요소 노드의 형제도 아님
⇒ 어트리뷰트 노드에 접근하기 위해선 먼저 요소 노드에 접근 필요
텍스트 노드(text node)
- HTML 요소의 텍스트를 가리키는 객체
- 문서의 정보를 표현
- 요소 노드의 자식 노드이자 자식 노드를 가질 수 없는 리프 노드
- DOM 트리의 최종단
- 텍스트 노드에 접근하기 위해선 먼저 요소 노드에 접근 필요
39.1.3 노드 객체의 상속 구조
- DOM을 구성하는 노드 객체는 브라우저 환경에서 추가로 제공하는 호스트 객체(host objects)이자 자바스크립트 객체
- 자바스크립트 객체이므로 프로토타입에 의한 상속 구조를 가짐
- 노드 객체의 상속 구조
- Object
- EventTarget
- Node
- Document, Element, Attr, CharacterData
여러 노드 객체의 상속 구조
- 문서 노드의 상속 구조
- Document
- HTMLDocument 인터페이스
- 문서 노드
- 어트리뷰트 노드의 상속 구조
- Attr
- 어트리뷰트 노드
- 텍스트 노드의 상속 구조
- CharacterData
- 텍스트 노드
- 요소 노드의 상속 구조
- Element 인터페이스
- HTMLElement
- HTMLHtmlElement, HTMLHeadElement, HTMLBodyElement, HTMLUListElement 등의 인터페이스
- 예)
input요소르르 파싱해 객체화한input요소 노드 객체가 상속받는 프로토타입 객체- HTMLInputElement ⇒ HTML 요소 중에서
input요소를 표현하는 객체 - HTMLElement ⇒ 웹 문서의 요소 중에서 HTML 요소를 표현하는 객체
- Element ⇒ 브라우저가 렌더링할 수 있는 웹 문서의 요소(HTML, XML, SVG)를 표현하는 객체
- Node ⇒ 트리 자료구조의 노드 객체
- EventTarget ⇒ 이벤트를 발생시키는 객체
- Object ⇒ 객체
1
2
3
4
5
6
7
8
9
10
11
12
13
14
15
16
17
18
19
20
  <!DOCTYPE html>
  <html>
  <body>
    <input type="text">
    <script>
      // input 요소 노드 객체를 선택
      const $input = document.querySelector('input');

      // input 요소 노드 객체의 프로토타입 체인
      console.log(
        Object.getPrototypeOf($input) === HTMLInputElement.prototype,
        Object.getPrototypeOf(HTMLInputElement.prototype) === HTMLElement.prototype,
        Object.getPrototypeOf(HTMLElement.prototype) === Element.prototype,
        Object.getPrototypeOf(Element.prototype) === Node.prototype,
        Object.getPrototypeOf(Node.prototype) === EventTarget.prototype,
        Object.getPrototypeOf(EventTarget.prototype) === Object.prototype
      ); // 모두 true
    </script>
  </body>
  </html>
- HTMLInputElement ⇒ HTML 요소 중에서
노드 객체의 기능
- EventTarget 인터페이스
- 이벤트와 관련된 기능을 제공
- 모든 노드 객체는 공통으로 이벤트를 발생시킬 수 있다.
EventTarget.addEventListener,EventTarget.removeEventListener등
- Node 인터페이스
- 트리 탐색 기능, 노드 정보 제공 기능을 제공
Node.parentNode,Node.childNodes,Node.previousSibling,Node.nextSibling등Node.nodeType,Node.nodeName등
- HTMLElement 인터페이스
- HTML 요소가 갖는 공통적인 기능을 제공
style프로퍼티 등
- 필요한 기능을 제공하는 인터페이스는 HTML 요소의 종류에 따라 다르다.
HTMLInputElement,HTMLDivElement등
39.2 요소 노드 취득
요소 노드의 취득은 HTML 요소를 조작하는 시작점이다.
39.2.1 id를 이용한 요소 노드 취득
id- HTML 문서 내에서 유일한 값
- 중복된
id가 여러 개 있어도 에러가 발생하진 않는다.
- 중복된
- HTML 요소는 단 하나의
id만 가질 수 있음 HTML 요소에
id를 부여하면 그 값과 동일한 이름의 전역 변수가 암묵적으로 선언되고 해당 노드 객체가 할당되는 부수 효과 발생1 2 3 4 5 6 7 8 9 10 11 12 13 14
<!DOCTYPE html> <html> <body> <div id="foo"></div> <script> // id 값과 동일한 이름의 전역 변수가 암묵적으로 선언되고 해당 노드 객체가 할당 console.log(foo === document.getElementById('foo')); // true // 암묵적 전역으로 생성된 전역 프로퍼티는 삭제되지만 전역 변수는 삭제되지 않음 delete foo; console.log(foo); // <div id="foo"></div> </script> </body> </html>
동일한 이름의 전역 변수가 이미 선언되었다면 거기에 노드 객체가 재할당되지는 않음
1
2
3
4
5
6
7
8
9
10
11
12
13
  <!DOCTYPE html>
  <html>
    <body>
      <div id="foo"></div>
      <script>
        let foo = 1;

        // id 값과 동일한 이름의 전역 변수가 이미 선언되어 있으면
  			// 노드 객체가 재할당되지 않는다.
        console.log(foo); // 1
      </script>
    </body>
  </html>
- HTML 문서 내에서 유일한 값
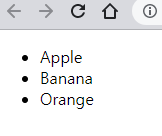
Document.prototype.getElementById메서드Document.prototype의 프로퍼티이므로 문서 노드인document를 통해 호출인수로 전달한 id 어트리뷰트 값을 갖는 하나의 요소 노드를 탐색해 반환
1 2 3 4 5 6 7 8 9 10 11 12 13 14 15 16 17 18
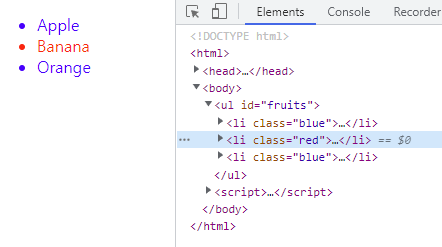
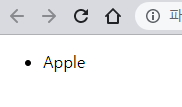
<!DOCTYPE html> <html> <body> <ul> <li id="apple">Apple</li> <li id="banana">Banana</li> <li id="orange">Orange</li> </ul> <script> // id 값이 'banana'인 요소 노드를 탐색하여 반환한다. // 두 번째 li 요소가 파싱되어 생성된 요소 노드가 반환된다. const $elem = document.getElementById('banana'); // 취득한 요소 노드의 style.color 프로퍼티 값을 변경한다. $elem.style.color = 'red'; </script> </body> </html>
중복된
id가 여러 개 있으면 그 중 첫 번째 요소 노드만 반환한다.1 2 3 4 5 6 7 8 9 10 11 12 13 14 15 16 17 18
<!DOCTYPE html> <html> <body> <ul> <li id="banana">Apple</li> <li id="banana">Banana</li> <li id="banana">Orange</li> </ul> <script> // getElementById 메서드는 언제나 단 하나의 요소 노드를 반환한다. // 첫 번째 li 요소가 파싱되어 생성된 요소 노드가 반환된다. const $elem = document.getElementById('banana'); // 취득한 요소 노드의 style.color 프로퍼티 값을 변경한다. $elem.style.color = 'red'; </script> </body> </html>
존재하지 않는 경우
null반환1 2 3 4 5 6 7 8 9 10 11 12 13 14 15 16 17 18
<!DOCTYPE html> <html> <body> <ul> <li id="apple">Apple</li> <li id="banana">Banana</li> <li id="orange">Orange</li> </ul> <script> // id 값이 'grape'인 요소 노드를 탐색하여 반환한다. null이 반환된다. const $elem = document.getElementById('grape'); // 취득한 요소 노드의 style.color 프로퍼티 값을 변경한다. $elem.style.color = 'red'; // -> TypeError: Cannot read property 'style' of null </script> </body> </html>
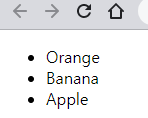
39.2.2 태그 이름을 이용한 요소 노드 취득
Document.prototype/Element.prototype.getElementsByTagName메서드- 인수로 전달한 태그 이름을 갖는 모든 요소 노드를 탐색하여 반환
- 여러 개의 요소 노드 객체를 갖는 DOM 컬렉션 객체인
HTMLCollection객체 반환 - 일치하는 요소가 존재하지 않는 경우 빈
HTMLCollection객체 반환
1 2 3 4 5 6 7 8 9 10 11 12 13 14 15 16 17 18 19 20
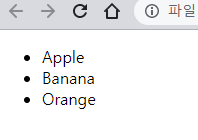
<!DOCTYPE html> <html> <body> <ul> <li id="apple">Apple</li> <li id="banana">Banana</li> <li id="orange">Orange</li> </ul> <script> // 태그 이름이 li인 요소 노드를 모두 탐색하여 반환한다. // 탐색된 요소 노드들은 HTMLCollection 객체에 담겨 반환된다. // HTMLCollection 객체는 유사 배열 객체이면서 이터러블이다. const $elems = document.getElementsByTagName('li'); // 취득한 모든 요소 노드의 style.color 프로퍼티 값을 변경한다. // HTMLCollection 객체를 배열로 변환하여 순회하며 color 프로퍼티 값을 변경한다. [...$elems].forEach(elem => { elem.style.color = 'red'; }); </script> </body> </html>
HTMLCollection객체- 유사 배열 객체이면서 이터러블
- HTML 문서의 모든 요소 노드를 취득하는 방법
getElementsByTagName메서드의 인수로*전달
1 2 3
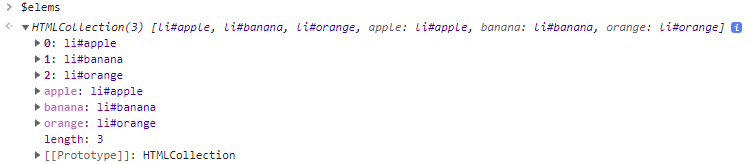
// 모든 요소 노드를 탐색하여 반환한다. const $all = document.getElementsByTagName('*'); // -> HTMLCollection(8) [html, head, body, ul, li#apple, li#banana, li#orange, script, apple: li#apple, banana: li#banana, orange: li#orange] Document.prototype.getElementsByTagName메서드- 문서 노드를 통해 호출
- DOM 전체에서 요소 노드를 탐색해 반환
1
2
3
4
5
6
7
8
9
10
11
12
13
14
15
16
17
18
  <!DOCTYPE html>
  <html>
    <body>
      <ul id="fruits">
        <li>Apple</li>
        <li>Banana</li>
        <li>Orange</li>
      </ul>
      <ul>
        <li>HTML</li>
      </ul>
      <script>
        // DOM 전체에서 태그 이름이 li인 요소 노드를 모두 탐색하여 반환한다.
        const $lisFromDocument = document.getElementsByTagName('li');
        console.log($lisFromDocument); // HTMLCollection(4) [li, li, li, li]
      </script>
    </body>
  </html>
Element.prototype.getElementsByTagName메서드- 특정 요소 노드를 통해 호출
- 특정 요소 노드의 자손 노드 중에서 요소 노드를 탐색해 반환
1
2
3
4
5
6
7
8
9
10
11
12
13
14
15
16
17
18
19
20
  <!DOCTYPE html>
  <html>
    <body>
      <ul id="fruits">
        <li>Apple</li>
        <li>Banana</li>
        <li>Orange</li>
      </ul>
      <ul>
        <li>HTML</li>
      </ul>
      <script>
        // #fruits 요소의 자손 노드 중에서 태그 이름이 li인 요소 노드를 모두
        // 탐색하여 반환한다.
        const $fruits = document.getElementById('fruits');
        const $lisFromFruits = $fruits.getElementsByTagName('li');
        console.log($lisFromFruits); // HTMLCollection(3) [li, li, li]
      </script>
    </body>
  </html>
39.2.3 class를 이용한 요소 노드 취득
Document.prototype/Element.prototype.getElementsByClassName메서드- 인수로 전달한 class 값을 갖는 모든 요소 노드를 탐색하여 반환
- 공백으로 구분하여 여러 개의 class 지정 가능
- 여러 개의 요소 노드 객체를 갖는 DOM 컬렉션 객체인
HTMLCollection객체 반환 - 일치하는 요소가 존재하지 않는 경우 빈
HTMLCollection객체 반환
1
2
3
4
5
6
7
8
9
10
11
12
13
14
15
16
17
18
19
20
21
22
23
24
25
  <!DOCTYPE html>
  <html>
    <body>
      <ul>
        <li class="fruit apple">Apple</li>
        <li class="fruit banana">Banana</li>
        <li class="fruit orange">Orange</li>
      </ul>
      <script>
        // class 값이 'fruit'인 요소 노드를 모두 탐색하여
  			// HTMLCollection 객체에 담아 반환한다.
        const $elems = document.getElementsByClassName('fruit');

        // 취득한 모든 요소의 CSS color 프로퍼티 값을 변경한다.
        [...$elems].forEach(elem => { elem.style.color = 'red'; });

        // class 값이 'fruit apple'인 요소 노드를 모두 탐색하여
  			// HTMLCollection 객체에 담아 반환한다.
        const $apples = document.getElementsByClassName('fruit apple');

        // 취득한 모든 요소 노드의 style.color 프로퍼티 값을 변경한다.
        [...$apples].forEach(elem => { elem.style.color = 'blue'; });
      </script>
    </body>
  </html>
- 인수로 전달한 class 값을 갖는 모든 요소 노드를 탐색하여 반환
Document.prototype.getElementsByClassName메서드- 문서 노드를 통해 호출
- DOM 전체에서 요소 노드를 탐색해 반환
1
2
3
4
5
6
7
8
9
10
11
12
13
14
15
16
17
  <!DOCTYPE html>
  <html>
    <body>
      <ul id="fruits">
        <li class="apple">Apple</li>
        <li class="banana">Banana</li>
        <li class="orange">Orange</li>
      </ul>
      <div class="banana">Banana</div>
      <script>
        // DOM 전체에서 class 값이 'banana'인 요소 노드를 모두 탐색하여 반환한다.
        const $bananasFromDocument = document.getElementsByClassName('banana');
        console.log($bananasFromDocument);
  			// HTMLCollection(2) [li.banana, div.banana]
      </script>
    </body>
  </html>
Element.prototype.getElementsByClassName메서드- 특정 요소 노드를 통해 호출
- 특정 요소 노드의 자손 노드 중에서 요소 노드를 탐색해 반환
1
2
3
4
5
6
7
8
9
10
11
12
13
14
15
16
17
18
19
  <!DOCTYPE html>
  <html>
    <body>
      <ul id="fruits">
        <li class="apple">Apple</li>
        <li class="banana">Banana</li>
        <li class="orange">Orange</li>
      </ul>
      <div class="banana">Banana</div>
      <script>
        // #fruits 요소의 자손 노드 중에서 class 값이 'banana'인 요소 노드를
  			// 모두 탐색하여 반환한다.
        const $fruits = document.getElementById('fruits');
        const $bananasFromFruits = $fruits.getElementsByClassName('banana');

        console.log($bananasFromFruits); // HTMLCollection [li.banana]
      </script>
    </body>
  </html>
39.2.4 CSS 선택자를 이용한 요소 노드 취득
- CSS 선택자(selector)
- 스타일을 적용하고자 하는 HTML 요소를 특정할 때 사용하는 문법
1
2
3
4
5
6
7
8
9
10
11
12
13
14
15
16
17
18
19
20
21
22
23
  /* 전체 선택자: 모든 요소를 선택 */
  * { ... }
  /* 태그 선택자: 모든 p 태그 요소를 모두 선택 */
  p { ... }
  /* id 선택자: id 값이 'foo'인 요소를 모두 선택 */
  #foo { ... }
  /* class 선택자: class 값이 'foo'인 요소를 모두 선택 */
  .foo { ... }
  /* 어트리뷰트 선택자: input 요소 중에 type 어트리뷰트 값이 'text'인 요소를 모두 선택 */
  input[type=text] { ... }
  /* 후손 선택자: div 요소의 후손 요소 중 p 요소를 모두 선택 */
  div p { ... }
  /* 자식 선택자: div 요소의 자식 요소 중 p 요소를 모두 선택 */
  div > p { ... }
  /* 인접 형제 선택자: p 요소의 형제 요소 중에 p 요소 바로 뒤에 위치하는 ul 요소를 선택 */
  p + ul { ... }
  /* 일반 형제 선택자: p 요소의 형제 요소 중에 p 요소 뒤에 위치하는 ul 요소를 모두 선택 */
  p ~ ul { ... }
  /* 가상 클래스 선택자: hover 상태인 a 요소를 모두 선택 */
  a:hover { ... }
  /* 가상 요소 선택자: p 요소의 콘텐츠의 앞에 위치하는 공간을 선택
     일반적으로 content 프로퍼티와 함께 사용된다. */
  p::before { ... }
Document.prototype/Element.prototype.querySelector메서드- 인수로 전달한 CSS 선택자를 만족시키는 하나의 요소 노드를 탐색하여 반환
- 조건을 만족하는 요소 노드가 여러 개인 경우 첫 번째 요소 노드 반환
- 조건을 만족하는 요소 노드가 존재하지 않는 경우
null반환
- 인수로 전달한 CSS 선택자가 문법이 맞지 않는 경우
DOMException에러 발생
1
2
3
4
5
6
7
8
9
10
11
12
13
14
15
16
17
  <!DOCTYPE html>
  <html>
    <body>
      <ul>
        <li class="apple">Apple</li>
        <li class="banana">Banana</li>
        <li class="orange">Orange</li>
      </ul>
      <script>
        // class 어트리뷰트 값이 'banana'인 첫 번째 요소 노드를 탐색하여 반환한다.
        const $elem = document.querySelector('.banana');

        // 취득한 요소 노드의 style.color 프로퍼티 값을 변경한다.
        $elem.style.color = 'red';
      </script>
    </body>
  </html>
- 인수로 전달한 CSS 선택자를 만족시키는 하나의 요소 노드를 탐색하여 반환
Document.prototype/Element.prototype.querySelectorAll메서드- 인수로 전달한 CSS 선택자를 만족시키는 모든 요소 노드를 탐색하여
NodeList객체 반환NodeList객체: 여러 개의 요소 노드 객체를 갖는 DOM 컬렉션 객체- 유사 배열 객체이며 이터러블이다.
- 조건을 만족하는 요소 노드가 존재하지 않는 경우 빈
NodeList객체 반환
- 인수로 전달한 CSS 선택자가 문법이 맞지 않는 경우
DOMException에러 발생
1
2
3
4
5
6
7
8
9
10
11
12
13
14
15
16
17
18
19
20
  <!DOCTYPE html>
  <html>
    <body>
      <ul>
        <li class="apple">Apple</li>
        <li class="banana">Banana</li>
        <li class="orange">Orange</li>
      </ul>
      <script>
        // ul 요소의 자식 요소인 li 요소를 모두 탐색하여 반환한다.
        const $elems = document.querySelectorAll('ul > li');
        // 취득한 요소 노드들은 NodeList 객체에 담겨 반환된다.
        console.log($elems); // NodeList(3) [li.apple, li.banana, li.orange]

        // 취득한 모든 요소 노드의 style.color 프로퍼티 값을 변경한다.
        // NodeList는 forEach 메서드를 제공한다.
        $elems.forEach(elem => { elem.style.color = 'red'; });
      </script>
    </body>
  </html>
- 인수로 전달한 CSS 선택자를 만족시키는 모든 요소 노드를 탐색하여
- HTML 문서의 모든 요소 노드를 취득하는 방법
querySelectorAll메서드의 인수로*전달
1
2
3
  // 모든 요소 노드를 탐색하여 반환한다.
  const $all = document.querySelectorAll('*');
  // -> NodeList(8) [html, head, body, ul, li#apple, li#banana, li#orange, script]
Document.prototype.querySelectorAll메서드- 문서 노드를 통해 호출
- DOM 전체에서 요소 노드를 탐색해 반환
Element.prototype.querySelectorAll메서드- 특정 요소 노드를 통해 호출
- 특정 요소 노드의 자손 노드 중에서 요소 노드를 탐색해 반환
getElementById,getElementsBy***메서드와의 차이점
querySelector, querySelectorAll 메서드
- 단점
getElementById,getElementsBy***메서드보다 느리다.
- 장점
- CSS 선택자 문법 사용 ⇒ 구체적인 조건을 이용해 일관된 방식으로 요소 취득 가능
- 권장 사항
id어트리뷰트가 있는 요소 취득 ⇒getElementById사용- 그 외의 경우 ⇒
querySelector,querySelectorAll메서드 사용
39.2.5 특정 요소 노드를 취득할 수 있는지 확인
Element.prototype.matches 메서드를 사용한다.
- 인수로 전달한 CSS 선택자를 통해 특정 요소 노드를 취득할 수 있는지 확인
- 이벤트 위임을 사용할 때 유용
1
2
3
4
5
6
7
8
9
10
11
12
13
14
15
16
17
18
19
<!DOCTYPE html>
<html>
  <body>
    <ul id="fruits">
      <li class="apple">Apple</li>
      <li class="banana">Banana</li>
      <li class="orange">Orange</li>
    </ul>
  </body>
  <script>
    const $apple = document.querySelector('.apple');

    // $apple 노드는 '#fruits > li.apple'로 취득할 수 있다.
    console.log($apple.matches('#fruits > li.apple'));  // true

    // $apple 노드는 '#fruits > li.banana'로 취득할 수 없다.
    console.log($apple.matches('#fruits > li.banana')); // false
  </script>
</html>
39.2.6 HTMLCollection과 NodeList
- DOM API가 여러 개의 결괏값을 반환하기 위한 DOM 컬렉션 객체
- 유사 배열 객체이면서 이터러블
for...of문으로 순회 가능, 스프레드 문법을 사용해 간편히 배열로 변환 가능
- 살아있는(live) 객체
- 노드 객체의 상태 변화를 실시간으로 반영
HTMLCollection은 언제나 live 객체로 동작NodeList는 대부분 non-live 객체로 동작 + 때에 따라 live 객체로 동작
HTMLCollection
getElementsByTagName,getElementByClassName메서드가 반환- live DOM 컬렉션 객체
HTMLCollection객체의 부작용 - 순회 시 주의 사항1 2 3 4 5 6 7 8 9 10 11 12 13 14 15 16 17 18 19 20 21 22 23 24 25 26 27 28 29 30
<!DOCTYPE html> <head> <style> .red { color: red; } .blue { color: blue; } </style> </head> <html> <body> <ul id="fruits"> <li class="red">Apple</li> <li class="red">Banana</li> <li class="red">Orange</li> </ul> <script> // class 값이 'red'인 요소 노드를 모두 탐색하여 HTMLCollection 객체에 담아 반환 const $elems = document.getElementsByClassName('red'); // 이 시점에 HTMLCollection 객체에는 3개의 요소 노드가 담겨 있다. console.log($elems); // HTMLCollection(3) [li.red, li.red, li.red] // HTMLCollection 객체의 모든 요소의 class 값을 'blue'로 변경한다. for (let i = 0; i < $elems.length; i++) { $elems[i].className = 'blue'; } // HTMLCollection 객체의 요소가 3개에서 1개로 변경되었다. console.log($elems); // HTMLCollection(1) [li.red] </script> </body> </html>
- 예상) 모든
li요소의class값이blue로 변경될 것이다. - 실제) 첫 번째
for문이 실행되면 첫 번째li요소는$elems에서 실시간으로 제거된다. 따라서 그다음 호출되는$elems[1]은 세 번째li요소가 된다. 회피 1)
for문을 역방향으로 순회1 2 3 4
// for 문을 역방향으로 순회 for (let i = $elems.length - 1; i >= 0; i--) { $elems[i].className = 'blue'; }
회피 2)
while문을 사용하여HTMLCollection객체에 노드 객체가 남아있지 않을 때까지 무한 반복1 2 3 4 5
// while 문으로 HTMLCollection에 요소가 남아 있지 않을 때까지 무한 반복 let i = 0; while ($elems.length > i) { $elems[i].className = 'blue'; }
- 간단한 해결책)
HTMLCollection객체를 사용하지 않는다.- 배열로 변환하면 부작용도 없어지고 여러 고차 함수도 사용할 수 있게 된다.
1
2
  // 유사 배열 객체이면서 이터러블인 HTMLCollection을 배열로 변환하여 순회
  [...$elems].forEach(elem => elem.className = 'blue');
- 예상) 모든
NodeList
HTMLCollection객체의 부작용 해결을 위해서 대신NodeList객체 사용 가능querySelectorAll메서드가 반환
- 실시간으로 노드 객체의 상태 변경을 반영하지 않는 non-live 객체
NodeList.prototype.forEach메서드를 상속받아 사용 가능1 2 3 4 5
// querySelectorAll은 DOM 컬렉션 객체인 NodeList를 반환한다. const $elems = document.querySelectorAll('.red'); // NodeList 객체는 NodeList.prototype.forEach 메서드를 상속받아 사용할 수 있다. $elems.forEach(elem => elem.className = 'blue');
Array.prototype.forEach메서드와 같은 사용 방법NodeList.prototype은item,entries,keys,values메서드도 함께 제공
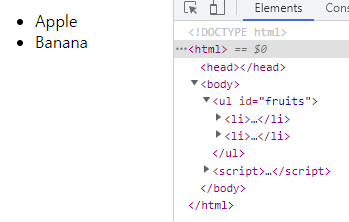
**childNodes프로퍼티가 반환하는NodeList객체는 live 객체로 동작한다.**1 2 3 4 5 6 7 8 9 10 11 12 13 14 15 16 17 18 19 20 21 22 23 24 25 26 27 28 29 30
<!DOCTYPE html> <html> <body> <ul id="fruits"> <li>Apple</li> <li>Banana</li> </ul> </body> <script> const $fruits = document.getElementById('fruits'); // childNodes 프로퍼티는 NodeList 객체(live)를 반환한다. const { childNodes } = $fruits; console.log(childNodes instanceof NodeList); // true // $fruits 요소의 자식 노드는 공백 텍스트 노드를 포함해 모두 5개다. console.log(childNodes); // NodeList(5) [text, li, text, li, text] for (let i = 0; i < childNodes.length; i++) { // removeChild 메서드는 $fruits 요소의 자식 노드를 DOM에서 삭제한다. // (39.6.9절 "노드 삭제" 참고) // removeChild 메서드가 호출될 때마다 NodeList 객체인 childNodes가 // 실시간으로 변경된다. 따라서 첫 번째, 세 번째 다섯 번째 요소만 삭제된다. $fruits.removeChild(childNodes[i]); } // 예상과 다르게 $fruits 요소의 모든 자식 노드가 삭제되지 않는다. console.log(childNodes); // NodeList(2) [li, li] </script> </html>
권장 사항
HTMLCollection과NodeList객체는 예상과 다르게 동작할 수 있다. ⇒ 안전하게 DOM 컬렉션을 사용하기 위해 배열로 변환하여 사용하는 것을 권장한다.- 배열로 변환하면 부작용도 없어지고 여러 고차 함수(
forEach,map,filter,reduce등)도 사용할 수 있게 된다. - 유사 배열 객체이며 이터러블이기 때문에 스프레드 문법이나
Array.from메서드로 간단히 배열로 변환할 수 있다.
1
2
3
4
5
6
7
8
9
10
11
12
13
14
15
16
17
18
19
20
21
22
23
<!DOCTYPE html>
<html>
<body>
<ul id="fruits">
<li>Apple</li>
<li>Banana</li>
</ul>
</body>
<script>
const $fruits = document.getElementById('fruits');
// childNodes 프로퍼티는 NodeList 객체(live)를 반환한다.
const { childNodes } = $fruits;
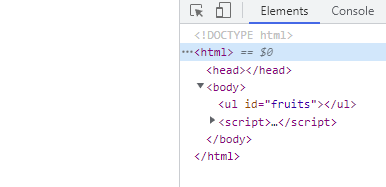
// 스프레드 문법을 사용하여 NodeList 객체를 배열로 변환한다.
[...childNodes].forEach(childNode => {
$fruits.removeChild(childNode);
});
// $fruits 요소의 모든 자식 노드가 모두 삭제되었다.
console.log(childNodes); // NodeList []
</script>
</html>
39.3 노드 탐색
- traversing, node walking
- 트리 노드 탐색 프로퍼티
- DOM 트리 상의 노드를 탐색할 수 있도록
Node,Element인터페이스가 제공 Node.prototype:parentNode,previousSibling,firstChild,childNodes프로퍼티 제공Element.prototype:previousElementSibling,nextElementSibling,children프로퍼티 제공- getter만 존재하는 읽기 전용 접근자 프로퍼티
- 값을 할당하면 에러 없이 무시된다.
- DOM 트리 상의 노드를 탐색할 수 있도록
39.3.1 공백 텍스트 노드
- HTML 요소 사이의 스페이스, 탭, 줄 바꿈 등의 공백 문자(white space)가 생성
인위적으로 공백 텍스트 노드 생성을 막을 수 있지만 가독성이 떨어진다.
1
2
3
4
  <ul id="fruits"><li
    class="apple">Apple</li><li
    class="banana">Banana</li><li
    class="orange">Orange</li></ul>
39.3.2 자식 노드 탐색
| 프로퍼티 | 설명 |
|---|---|
| Node.prototype.childNodes | 자식 노드를 모두 탐색해 NodeList에 담아 반환 반환한 NodeList에는 요소 노드 외에도 텍스트 노드가 포함될 수 있다. |
| Element.prototype.children | 자식 노드중 요소 노드만 탐색해 HTMLCollection에 담아 반환 반환한 HTMLCollection에는 텍스트 노드가 포함되지 않는다. |
| Node.prototype.firstChild | 첫 번째 자식 노드 반환 반환한 노드는 텍스트 노드이거나 요소 노드다. |
| Node.prototype.lastChild | 마지막 자식 노드 반환 반환한 노드는 텍스트 노드이거나 요소 노드다. |
| Element.prototype.firstElementChild | 첫 번째 자식 노드 반환 요소 노드만 반환한다. |
| Element.prototype.lastElementChild | 마지막 자식 노드 반환 요소 노드만 반환한다. |
1
2
3
4
5
6
7
8
9
10
11
12
13
14
15
16
17
18
19
20
21
22
23
24
25
26
27
28
29
30
31
32
33
34
35
36
37
38
39
40
<!DOCTYPE html>
<html>
  <body>
    <ul id="fruits">
      <li class="apple">Apple</li>
      <li class="banana">Banana</li>
      <li class="orange">Orange</li>
    </ul>
  </body>
  <script>
    // 노드 탐색의 기점이 되는 #fruits 요소 노드를 취득한다.
    const $fruits = document.getElementById('fruits');

    // #fruits 요소의 모든 자식 노드를 탐색한다.
    // childNodes 프로퍼티가 반환한 NodeList에는 요소 노드뿐만 아니라 텍스트 노드도 포함
    console.log($fruits.childNodes);
    // NodeList(7) [text, li.apple, text, li.banana, text, li.orange, text]

    // #fruits 요소의 모든 자식 노드를 탐색한다.
    // children 프로퍼티가 반환한 HTMLCollection에는 요소 노드만 포함되어 있다.
    console.log($fruits.children);
    // HTMLCollection(3) [li.apple, li.banana, li.orange]

    // #fruits 요소의 첫 번째 자식 노드를 탐색한다.
    // firstChild 프로퍼티는 텍스트 노드를 반환할 수도 있다.
    console.log($fruits.firstChild); // #text

    // #fruits 요소의 마지막 자식 노드를 탐색한다.
    // lastChild 프로퍼티는 텍스트 노드를 반환할 수도 있다.
    console.log($fruits.lastChild); // #text

    // #fruits 요소의 첫 번째 자식 노드를 탐색한다.
    // firstElementChild 프로퍼티는 요소 노드만 반환한다.
    console.log($fruits.firstElementChild); // li.apple

    // #fruits 요소의 마지막 자식 노드를 탐색한다.
    // lastElementChild 프로퍼티는 요소 노드만 반환한다.
    console.log($fruits.lastElementChild); // li.orange
  </script>
</html>
39.3.3 자식 노드 존재 확인
Node.prototype.hasChildNodes메서드 사용- 존재 여부를 불리언 값으로 반환
텍스트 노드를 포함하여 자식 노드 존재 확인
1
2
3
4
5
6
7
8
9
10
11
12
13
14
15
  <!DOCTYPE html>
  <html>
    <body>
      <ul id="fruits">
      </ul>
    </body>
    <script>
      // 노드 탐색의 기점이 되는 #fruits 요소 노드를 취득한다.
      const $fruits = document.getElementById('fruits');

      // #fruits 요소에 자식 노드가 존재하는지 확인한다.
      // hasChildNodes 메서드는 텍스트 노드를 포함하여 자식 노드의 존재를 확인한다.
      console.log($fruits.hasChildNodes()); // true
    </script>
  </html>
children.length또는Element인터페이스의childElementCount프로퍼티 사용- 자식 노드 중 텍스트 노드가 아닌 요소 노드의 존재를 확인
1
2
3
4
5
6
7
8
9
10
11
12
13
14
15
16
17
18
19
20
21
  <!DOCTYPE html>
  <html>
    <body>
      <ul id="fruits">
      </ul>
    </body>
    <script>
      // 노드 탐색의 기점이 되는 #fruits 요소 노드를 취득한다.
      const $fruits = document.getElementById('fruits');

      // hasChildNodes 메서드는 텍스트 노드를 포함하여 자식 노드의 존재를 확인한다.
      console.log($fruits.hasChildNodes()); // true

      // 자식 노드 중에 텍스트 노드가 아닌 요소 노드가 존재하는지는 확인한다.
      console.log(!!$fruits.children.length); // 0 -> false
      // 자식 노드 중에 텍스트 노드가 아닌 요소 노드가 존재하는지는 확인한다.
      console.log(!!$fruits.childElementCount); // 0 -> false

  		// 참고) 불리언 값을 얻기 위해 !! 사용
    </script>
  </html>
39.3.4 요소 노드의 텍스트 노드 탐색
- 요소 노드의 텍스트 노드는 요소 노드의 자식 노드이므로
firstChild프로퍼티로 접근 가능
1
2
3
4
5
6
7
8
9
10
<!DOCTYPE html>
<html>
<body>
  <div id="foo">Hello</div>
  <script>
    // 요소 노드의 텍스트 노드는 firstChild 프로퍼티로 접근할 수 있다.
    console.log(document.getElementById('foo').firstChild); // #text
  </script>
</body>
</html>
39.3.5 부모 노드 탐색
Node.prototype.parentNode 프로퍼티를 사용한다.
- 텍스트 노드는 리프 노드이므로 부모 노드가 텍스트 노드인 경우는 없다.
1
2
3
4
5
6
7
8
9
10
11
12
13
14
15
16
17
<!DOCTYPE html>
<html>
  <body>
    <ul id="fruits">
      <li class="apple">Apple</li>
      <li class="banana">Banana</li>
      <li class="orange">Orange</li>
    </ul>
  </body>
  <script>
    // 노드 탐색의 기점이 되는 .banana 요소 노드를 취득한다.
    const $banana = document.querySelector('.banana');

    // .banana 요소 노드의 부모 노드를 탐색한다.
    console.log($banana.parentNode); // ul#fruits
  </script>
</html>
39.3.6 형제 노드 탐색
- 형제 노드: 부모가 같은 노드
- 어트리뷰트 노드는 요소 노드와 연결되어 있지만 형제 노드는 아니기 때문에 탐색해도 반환되지 않는다.
| 프로퍼티 | 설명 |
|---|---|
| Node.prototype.previousSibling | 이전 형제 노드 반환 반환한 노드는 텍스트 노드이거나 요소 노드다. |
| Node.prototype.nextSibling | 다음 형제 노드 반환 반환한 노드는 텍스트 노드이거나 요소 노드다. |
| Element.prototype.previousElementSibling | 이전 형제 노드 반환 요소 노드만 반환한다. |
| Element.prototype.nextElementSibling | 다음 형제 노드 반환 요소 노드만 반환한다. |
1
2
3
4
5
6
7
8
9
10
11
12
13
14
15
16
17
18
19
20
21
22
23
24
25
26
27
28
29
30
31
32
33
34
35
36
37
38
39
40
41
42
43
44
<!DOCTYPE html>
<html>
  <body>
    <ul id="fruits">
      <li class="apple">Apple</li>
      <li class="banana">Banana</li>
      <li class="orange">Orange</li>
    </ul>
  </body>
  <script>
    // 노드 탐색의 기점이 되는 #fruits 요소 노드를 취득한다.
    const $fruits = document.getElementById('fruits');

    // #fruits 요소의 첫 번째 자식 노드를 탐색한다.
    // firstChild 프로퍼티는 요소 노드뿐만 아니라 텍스트 노드를 반환할 수도 있다.
    const { firstChild } = $fruits;
    console.log(firstChild); // #text

    // #fruits 요소의 첫 번째 자식 노드(텍스트 노드)의 다음 형제 노드를 탐색한다.
    // nextSibling 프로퍼티는 요소 노드뿐만 아니라 텍스트 노드를 반환할 수도 있다.
    const { nextSibling } = firstChild;
    console.log(nextSibling); // li.apple

    // li.apple 요소의 이전 형제 노드를 탐색한다.
    // previousSibling 프로퍼티는 요소 노드뿐만 아니라 텍스트 노드를 반환할 수도 있다.
    const { previousSibling } = nextSibling;
    console.log(previousSibling); // #text

    // #fruits 요소의 첫 번째 자식 요소 노드를 탐색한다.
    // firstElementChild 프로퍼티는 요소 노드만 반환한다.
    const { firstElementChild } = $fruits;
    console.log(firstElementChild); // li.apple

    // #fruits 요소의 첫 번째 자식 요소 노드(li.apple)의 다음 형제 노드를 탐색한다.
    // nextElementSibling 프로퍼티는 요소 노드만 반환한다.
    const { nextElementSibling } = firstElementChild;
    console.log(nextElementSibling); // li.banana

    // li.banana 요소의 이전 형제 요소 노드를 탐색한다.
    // previousElementSibling 프로퍼티는 요소 노드만 반환한다.
    const { previousElementSibling } = nextElementSibling;
    console.log(previousElementSibling); // li.apple
  </script>
</html>
39.4 노드 정보 취득
| 프로퍼티 | 설명 |
|---|---|
| Node.prototype.noteType | 노드 타입을 나타내는 상수 반환 |
| Node.prototype.nodeName | 노드 이름을 문자열로 반환 |
- 노트 타입 상수
Node에 정의되어 있다.Node.ELEMENT_NODE: 요소 노드 타입을 나타내는 상수 1을 반환Node.TEXT_NODE: 텍스트 노드 타입을 나타내는 상수 3을 반환Node.DOCUMENT_NODE: 문서 노드 타입을 나타내는 상수 9를 반환
- 노드 이름
- 요소 노드: 대문자 문자열로 태그 이름 반환
- 텍스트 노드: 문자열
#text반환 - 문서 노드: 문자열
#document반환
1
2
3
4
5
6
7
8
9
10
11
12
13
14
15
16
17
18
19
20
21
<!DOCTYPE html>
<html>
  <body>
    <div id="foo">Hello</div>
  </body>
  <script>
    // 문서 노드의 노드 정보를 취득한다.
    console.log(document.nodeType); // 9
    console.log(document.nodeName); // #document

    // 요소 노드의 노드 정보를 취득한다.
    const $foo = document.getElementById('foo');
    console.log($foo.nodeType); // 1
    console.log($foo.nodeName); // DIV

    // 텍스트 노드의 노드 정보를 취득한다.
    const $textNode = $foo.firstChild;
    console.log($textNode.nodeType); // 3
    console.log($textNode.nodeName); // #text
</script>
</html>
39.5 요소 노드의 텍스트 조작
39.5.1 nodeValue
Node.prototype.nodeValue- setter와 getter 모두 존재하는 접근자 프로퍼티 ⇒ 참조와 할당 둘 다 가능
- 참조 시 노드 객체의 값을 반환
- 노드 객체의 값: 텍스트 노드의 텍스트
- 문서 노드나 요소 노드의
nodeValue프로퍼티 참조 시null반환
1
2
3
4
5
6
7
8
9
10
11
12
13
14
15
16
17
18
  <!DOCTYPE html>
  <html>
    <body>
      <div id="foo">Hello</div>
    </body>
    <script>
      // 문서 노드의 nodeValue 프로퍼티를 참조한다.
      console.log(document.nodeValue); // null

      // 요소 노드의 nodeValue 프로퍼티를 참조한다.
      const $foo = document.getElementById('foo');
      console.log($foo.nodeValue); // null

      // 텍스트 노드의 nodeValue 프로퍼티를 참조한다.
      const $textNode = $foo.firstChild;
      console.log($textNode.nodeValue); // Hello
    </script>
  </html>
- 텍스트 노드의
nodeValue프로퍼티에 값 할당 시 텍스트 변경 가능- 텍스트 노드는 요소 노드의 자식 노드이므로
firstChild프로퍼티를 사용하여 탐색 가능
1
2
3
4
5
6
7
8
9
10
11
12
13
14
15
  <!DOCTYPE html>
  <html>
    <body>
      <div id="foo">Hello</div>
    </body>
    <script>
      // 1. #foo 요소 노드의 자식 노드인 텍스트 노드를 취득한다.
      const $textNode = document.getElementById('foo').firstChild;

      // 2. nodeValue 프로퍼티를 사용하여 텍스트 노드의 값을 변경한다.
      $textNode.nodeValue = 'World';

      console.log($textNode.nodeValue); // World
    </script>
  </html>
- 텍스트 노드는 요소 노드의 자식 노드이므로
39.5.2 textContent
Node.prototype.textContent- setter와 getter 모두 존재하는 접근자 프로퍼티
- 요소 노드의
textContent프로퍼티 참조 시 요소 노드의 콘텐츠 영역 내 텍스트를 모두 반환- 콘텐츠 영역 ⇒ 시작 태그와 종료 태그 사이 영역
- 요소 노드의
childNodes프로퍼티가 반환한 모든 노드의 텍스트를 모두 반환 - 요소 노드의 텍스트와 모든 자손 노드의 텍스트를 취득/변경 가능
- HTML 마크업은 무시
1
2
3
4
5
6
7
8
9
10
  <!DOCTYPE html>
  <html>
    <body>
      <div id="foo">Hello <span>world!</span></div>
    </body>
    <script>
      // #foo 요소 노드의 텍스트를 모두 취득한다. 이때 HTML 마크업은 무시된다.
      console.log(document.getElementById('foo').textContent); // Hello world!
    </script>
  </html>
nodeValue프로퍼티와의 차이점- 텍스트 노드가 아닌 노드의
nodeValue프로퍼티는 null을 반환해 의미가 없다. - textContent 프로퍼티보다
nodeValue프로퍼티의 사용이 더 복잡하다.
1
2
3
4
5
6
7
8
9
10
11
12
13
14
15
  <!DOCTYPE html>
  <html>
    <body>
      <div id="foo">Hello <span>world!</span></div>
    </body>
    <script>
      // #foo 요소 노드는 텍스트 노드가 아니다.
      console.log(document.getElementById('foo').nodeValue); // null
      // #foo 요소 노드의 자식 노드인 텍스트 노드의 값을 취득한다.
      console.log(document.getElementById('foo').firstChild.nodeValue); // Hello
      // span 요소 노드의 자식 노드인 텍스트 노드의 값을 취득한다.
      console.log(document.getElementById('foo').lastChild.firstChild.nodeValue);
  		// world!
    </script>
  </html>
- 텍스트 노드가 아닌 노드의
요소 노드의 컨텐츠 영역에 자식 요소 노드가 없고 텍스트만 존재한다면
textContent프로퍼티를 사용하는 게 더 코드가 간단하다.1 2 3 4 5 6 7 8 9 10 11 12 13 14
<!DOCTYPE html> <html> <body> <!-- 요소 노드의 콘텐츠 영역에 다른 요소 노드가 없고 텍스트만 존재 --> <div id="foo">Hello</div> </body> <script> const $foo = document.getElementById('foo'); // 요소 노드의 콘텐츠 영역에 자식 요소 노드가 없고 텍스트만 존재한다면 // firstChild.nodeValue와 textContent는 같은 결과를 반환한다. console.log($foo.textContent === $foo.firstChild.nodeValue); // true </script> </html>
- 요소 노드의
textContent프로퍼티에 문자열을 할당하는 경우- 요소 노드의 모든 자식 요소가 제거되고 할당된 문자열이 추가된다.
- 할당할 문자열에 HTML 마크업이 포함되어 있어도 파싱되지 않고 텍스트로 취급된다.
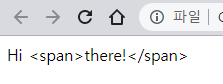
1
2
3
4
5
6
7
8
9
10
11
  <!DOCTYPE html>
  <html>
    <body>
      <div id="foo">Hello <span>world!</span></div>
    </body>
    <script>
      // #foo 요소 노드의 모든 자식 노드가 제거되고 할당한 문자열이 텍스트로 추가된다.
      // 이때 HTML 마크업이 파싱되지 않는다.
      document.getElementById('foo').textContent = 'Hi <span>there!</span>';
    </script>
  </html>
innerText프로퍼티textContent프로퍼티와 유사한 동작 수행- CSS에 순종적이기 때문에 예를 들어 CSS에 의해 표시가 되지 않는(
visibility: hidden;) 요소 노드의 텍스트는 반환하지 않는다. - CSS를 고려하기 때문에
textContent보다 느리다. - 따라서 사용하지 않는 것이 좋다.
39.6 DOM 조작
- 새로운 노드를 생성해 DOM에 추가하거나 기존 노드를 삭제/교체하는 작업
- 새로운 노드가 추가되거나 삭제되면 리플로우와 리페인트가 발생하므로 주의해야 한다.
- 리플로우와 리페인트는 성능에 영향을 주기 때문이다.
39.6.1 innerHTML
Element.prototype.innerHTML- setter와 getter 모두 존재하는 접근자 프로퍼티
- 요소 노드의 HTML 마크업을 취득/변경 가능
요소 노드의
innerHTML프로퍼티 참조 시 요소 노드의 콘텐츠 영역 내 HTML 마크업을 문자열로 반환1 2 3 4 5 6 7 8 9 10 11
<!DOCTYPE html> <html> <body> <div id="foo">Hello <span>world!</span></div> </body> <script> // #foo 요소의 콘텐츠 영역 내의 HTML 마크업을 문자열로 취득한다. console.log(document.getElementById('foo').innerHTML); // "Hello <span>world!</span>" </script> </html>
- 요소 노드의
innerHTML프로퍼티에 문자열을 할당하는 경우- 요소 노드의 모든 자식 요소가 제거되고 할당된 문자열이 추가된다.
- 할당할 문자열에 포함된 HTML 마크업은 파싱되어 요소 노드의 자식 노드로 DOM에 반영된다.
1
2
3
4
5
6
7
8
9
10
  <!DOCTYPE html>
  <html>
    <body>
      <div id="foo">Hello <span>world!</span></div>
    </body>
    <script>
      // HTML 마크업이 파싱되어 요소 노드의 자식 노드로 DOM에 반영된다.
      document.getElementById('foo').innerHTML = 'Hi <span>there!</span>';
    </script>
  </html>
HTML 마크업 문자열을 통한 간단한 DOM 조작
1
2
3
4
5
6
7
8
9
10
11
12
13
14
15
16
17
18
19
20
  <!DOCTYPE html>
  <html>
    <body>
      <ul id="fruits">
        <li class="apple">Apple</li>
      </ul>
    </body>
    <script>
      const $fruits = document.getElementById('fruits');

      // 노드 추가
      $fruits.innerHTML += '<li class="banana">Banana</li>';

      // 노드 교체
      $fruits.innerHTML = '<li class="orange">Orange</li>';

      // 노드 삭제
      $fruits.innerHTML = '';
    </script>
  </html>
innterHTML의 단점
- 크로스 사이트 스크립팅 공격
- Cross-Site Scripting Attacks, XSS
- 사용자가 입력한 데이터(untrusted input data)를 그대로 innerHTML 프로퍼티에 할당할 시 노출되는 공격
1
2
3
4
5
6
7
8
9
10
11
12
13
  <!DOCTYPE html>
  <html>
    <body>
      <div id="foo">Hello</div>
    </body>
    <script>
      // innerHTML 프로퍼티로 스크립트 태그를 삽입하여 자바스크립트가 실행되도록 한다.
      // HTML5는 innerHTML 프로퍼티로 삽입된 script 요소 내의
  		// 자바스크립트 코드를 실행하지 않는다.
      document.getElementById('foo').innerHTML
        = '<script>alert(document.cookie)</script>';
    </script>
  </html>
1
2
3
4
5
6
7
8
9
10
11
  <!DOCTYPE html>
  <html>
    <body>
      <div id="foo">Hello</div>
    </body>
    <script>
      // 에러 이벤트를 강제로 발생시켜서 자바스크립트 코드가 실행되도록 한다.
      document.getElementById('foo').innerHTML
        = `<img src="x" onerror="alert(document.cookie)">`;
    </script>
  </html>
- HTML 새니티제이션(sanitization)
- XSS를 예방하기 위해 잠재적 위험을 제거하는 기능
- 직접 구현보다는 DOMPurity 라이브러리 사용을 권장
1
2
  DOMPurify.sanitize('<img src=x onerror=alert(document.cookie)//>');
  // becomes <img src="x">
- HTML 마크업 문자열을 할당하는 경우 모든 자식 노드를 제거하고 DOM 변경
노드를 추가할 때 기존의 자식 노드를 두고 새 노드를 추가하지 않고, 모든 자식 노드를 제거한 뒤 새로운 노드를 생성하여 추가 ⇒ 비효율적
1
2
3
4
5
6
7
8
9
10
11
12
13
14
  <!DOCTYPE html>
  <html>
    <body>
      <ul id="fruits">
        <li class="apple">Apple</li>
      </ul>
    </body>
    <script>
      const $fruits = document.getElementById('fruits');

      // 노드 추가
      $fruits.innerHTML += '<li class="banana">Banana</li>';
    </script>
  </html>
1
2
3
4
5
  $fruits.innerHTML += '<li class="banana">Banana</li>';
  // 위 코드는 아래 코드의 축약 표현이다.
  $fruits.innerHTML = $fruits.innerHTML + '<li class="banana">Banana</li>';
  // '<li class="apple">Apple</li>' + '<li class="banana">Banana</li>'
  // li.apple 요소까지 제거한 뒤 새로 생성하여 자식 노드로 추가한다.
새로운 요소의 삽입 위치를 결정할 수 없다.
1
2
3
4
  <ul id="fruits">
    <li class="apple">Apple</li>
    <li class="orange">Orange</li>
  </ul>
innerHTML프로퍼티는li.apple요소와li.orange요소 사이에 새로운 요소를 삽입할 수 없다.
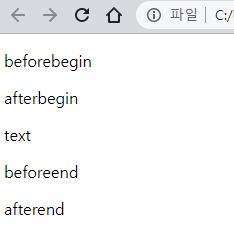
39.6.2 insertAdjacentHTML 메서드
Element.prototype.insertAdjacentHTML(position, DOMString)position:beforebegin|afterbegin|beforeend|afterendDOMString: HTML 마크업 문자열
기존 요소를 제거하지 않으면서
DOMString을 파싱해 생성된 노드를position에 삽입1 2 3 4 5 6 7 8 9 10 11 12 13 14 15 16 17 18 19 20
<!DOCTYPE html> <html> <body> <!-- beforebegin --> <div id="foo"> <!-- afterbegin --> text <!-- beforeend --> </div> <!-- afterend --> </body> <script> const $foo = document.getElementById('foo'); $foo.insertAdjacentHTML('beforebegin', '<p>beforebegin</p>'); $foo.insertAdjacentHTML('afterbegin', '<p>afterbegin</p>'); $foo.insertAdjacentHTML('beforeend', '<p>beforeend</p>'); $foo.insertAdjacentHTML('afterend', '<p>afterend</p>'); </script> </html>
- 기존 요소에 영향을 주지 않기 때문에
innerHTML보다 효율적이고 빠르다. innerHTML과 마찬가지로 XSS 공격에 취약하다.
39.6.3 노드 생성과 추가
1
2
3
4
5
6
7
8
9
10
11
12
13
14
15
16
17
18
19
20
21
22
23
<!DOCTYPE html>
<html>
  <body>
    <ul id="fruits">
      <li>Apple</li>
    </ul>
  </body>
  <script>
    const $fruits = document.getElementById('fruits');

    // 1. 요소 노드 생성
    const $li = document.createElement('li');

    // 2. 텍스트 노드 생성
    const textNode = document.createTextNode('Banana');

    // 3. 텍스트 노드를 $li 요소 노드의 자식 노드로 추가
    $li.appendChild(textNode);

    // 4. $li 요소 노드를 #fruits 요소 노드의 마지막 자식 노드로 추가
    $fruits.appendChild($li);
  </script>
</html>
요소 노드 생성
Document.prototype.createElement(tagName)메서드 사용tagName: 태그 이름을 나타내는 문자열
생성된 노드는 기존 DOM에 추가되지 않고 홀로 존재하는 상태다.
1
2
  // 1. 요소 노드 생성
  const $li = document.createElement('li');
생성된 노드는 요소 노드의 자식 노드인 텍스트 노드를 포함한 어떠한 자식 노드도 가지고 있지 않다.
1
2
3
4
  // 1. 요소 노드 생성
  const $li = document.createElement('li');
  // 생성된 요소 노드는 아무런 자식 노드가 없다.
  console.log($li.childNodes); // NodeList []
텍스트 노드 생성
Document.prototype.createTextNode(Text)메서드 사용Text: 텍스트 노드의 값으로 사용할 문자열
생성된 텍스트 노드는 요소 노드의 자식으로 추가되지 않고 홀로 존재하는 상태다.
1
2
  // 2. 텍스트 노드 생성
  const textNode = document.createTextNode('Banana');
텍스트 노드를 요소 노드의 자식 노드로 추가
Node.prototype.appendChild(childNode)메서드 사용- 메서드를 호출한 노드의 마지막 자식 노드로
childNode에 전달된 노드를 추가
1
2
  // 3. 텍스트 노드를 $li 요소 노드의 자식 노드로 추가
  $li.appendChild(textNode);
- 메서드를 호출한 노드의 마지막 자식 노드로
- 요소 노드에 자식 노드가 하나도 없는 경우 텍스트 노드를 추가하고 싶은 경우
- 텍스트 노드를 따로 생성해 추가하는 것보다
textContent프로퍼티를 사용하는 게 더 간편하다. - 요소 노드에 자식 노드가 있다면 모두 제거되므로 주의해야 한다.
1
2
3
4
5
  // 텍스트 노드를 생성하여 요소 노드의 자식 노드로 추가
  $li.appendChild(document.createTextNode('Banana'));

  // $li 요소 노드에 자식 노드가 하나도 없는 위 코드와 동일하게 동작한다.
  $li.textContent = 'Banana';
- 텍스트 노드를 따로 생성해 추가하는 것보다
요소 노드를 DOM에 추가
1
2
// 4. $li 요소 노드를 #fruits 요소 노드의 마지막 자식 노드로 추가
$fruits.appendChild($li);
- 기존의 DOM에 요소 노드를 추가하는 유일한 과정
- 이때 리플로우와 리페인트가 실행된다.
- 참고)
appendvsappendChild
39.6.4 복수의 노드 생성과 추가
비효율적인 예제
1
2
3
4
5
6
7
8
9
10
11
12
13
14
15
16
17
18
19
20
21
22
23
<!DOCTYPE html>
<html>
  <body>
    <ul id="fruits"></ul>
  </body>
  <script>
    const $fruits = document.getElementById('fruits');

    ['Apple', 'Banana', 'Orange'].forEach(text => {
      // 1. 요소 노드 생성
      const $li = document.createElement('li');

      // 2. 텍스트 노드 생성
      const textNode = document.createTextNode(text);

      // 3. 텍스트 노드를 $li 요소 노드의 자식 노드로 추가
      $li.appendChild(textNode);

      // 4. $li 요소 노드를 #fruits 요소 노드의 마지막 자식 노드로 추가
      $fruits.appendChild($li);
    });
  </script>
</html>
- 요소 노드를 DOM에 3번 추가 ⇒ 리플로우와 리페인트가 3번 실행 ⇒ 비효율적
컨테이너 요소
컨테이너 요소를 미리 생성한 뒤 변경 사항을 추가하고, 마지막에 컨테이너 요소를 DOM에 한 번만 추가한다.
1
2
3
4
5
6
7
8
9
10
11
12
13
14
15
16
17
18
19
20
21
22
23
24
25
26
27
28
29
<!DOCTYPE html>
<html>
  <body>
    <ul id="fruits"></ul>
  </body>
  <script>
    const $fruits = document.getElementById('fruits');

    // 컨테이너 요소 노드 생성
    const $container = document.createElement('div');

    ['Apple', 'Banana', 'Orange'].forEach(text => {
      // 1. 요소 노드 생성
      const $li = document.createElement('li');

      // 2. 텍스트 노드 생성
      const textNode = document.createTextNode(text);

      // 3. 텍스트 노드를 $li 요소 노드의 자식 노드로 추가
      $li.appendChild(textNode);

      // 4. $li 요소 노드를 컨테이너 요소의 마지막 자식 노드로 추가
      $container.appendChild($li);
    });

    // 5. 컨테이너 요소 노드를 #fruits 요소 노드의 마지막 자식 노드로 추가
    $fruits.appendChild($container);
  </script>
</html>
- DOM을 한 번만 변경 ⇒ 성능에 유리
하지만 불필요한 컨테이너 요소가 DOM에 추가된다.
1
2
3
4
5
6
7
  <ul id="fruits">
    <div>
      <li>apple</li>
      <li>banana</li>
      <li>orange</li>
    </div>
  </ul>
DocumentFragment 노드
- 문서 노드, 텍스트 노드와 같은 노드 객체의 일종
- 부모 노드가 없어서 기존 DOM과 별도로 존재
- 자식 노드가 추가되어도 기존 DOM에는 어떤 변경도 발생하지 않는다.
- 별도 서브 DOM을 구성해 기존 DOM에 추가하기 위한 용도로 사용
- 컨테이너 요소와 같은 용도
- 하지만 DOM에 추가될 때 자신은 제거되고 자식 노드만 추가된다.
Document.prototype.createDocumentFragment 메서드- 비어있는
DocumentFragment노드를 생성하여 반환
- 비어있는
결론
1
2
3
4
5
6
7
8
9
10
11
12
13
14
15
16
17
18
19
20
21
22
23
24
25
26
27
28
29
<!DOCTYPE html>
<html>
  <body>
    <ul id="fruits"></ul>
  </body>
  <script>
    const $fruits = document.getElementById('fruits');

    // DocumentFragment 노드 생성
    const $fragment = document.createDocumentFragment();

    ['Apple', 'Banana', 'Orange'].forEach(text => {
      // 1. 요소 노드 생성
      const $li = document.createElement('li');

      // 2. 텍스트 노드 생성
      const textNode = document.createTextNode(text);

      // 3. 텍스트 노드를 $li 요소 노드의 자식 노드로 추가
      $li.appendChild(textNode);

      // 4. $li 요소 노드를 DocumentFragment 노드의 마지막 자식 노드로 추가
      $fragment.appendChild($li);
    });

    // 5. DocumentFragment 노드를 #fruits 요소 노드의 마지막 자식 노드로 추가
    $fruits.appendChild($fragment);
  </script>
</html>
- DOM은 한 번만 변경 ⇒ 리플로우와 리페인트도 한 번만 실행
- 복수의 노드 생성과 추가에는
DocumentFragment노드를 사용하는 게 효율적이다.
39.6.5 노드 삽입
마지막 노드로 추가
Node.prototype.appendChild메서드
1
2
3
4
5
6
7
8
9
10
11
12
13
14
15
16
17
18
19
<!DOCTYPE html>
<html>
  <body>
    <ul id="fruits">
      <li>Apple</li>
      <li>Banana</li>
    </ul>
  </body>
  <script>
    // 요소 노드 생성
    const $li = document.createElement('li');

    // 텍스트 노드를 $li 요소 노드의 마지막 자식 노드로 추가
    $li.appendChild(document.createTextNode('Orange'));

    // $li 요소 노드를 #fruits 요소 노드의 마지막 자식 노드로 추가
    document.getElementById('fruits').appendChild($li);
  </script>
</html>
- 호출한 노드의 마지막 자식 노드로 인수로 전달된 노드를 DOM에 추가
지정된 위치에 노드 삽입
Node.prototype.insertBefore(newNode, childNode)메서드
1
2
3
4
5
6
7
8
9
10
11
12
13
14
15
16
17
18
19
20
21
22
<!DOCTYPE html>
<html>
  <body>
    <ul id="fruits">
      <li>Apple</li>
      <li>Banana</li>
    </ul>
  </body>
  <script>
    const $fruits = document.getElementById('fruits');

    // 요소 노드 생성
    const $li = document.createElement('li');

    // 텍스트 노드를 $li 요소 노드의 마지막 자식 노드로 추가
    $li.appendChild(document.createTextNode('Orange'));

    // $li 요소 노드를 #fruits 요소 노드의 마지막 자식 요소 앞에 삽입
    $fruits.insertBefore($li, $fruits.lastElementChild);
    // Apple - Orange - Banana
  </script>
</html>
- 첫 번째 인수의 노드를 두 번째 인수의 노드 앞에 삽입
- 두 번째 인수의 노드는 반드시 메서드를 호출한 노드의 자식 노드여야 한다.
- 그렇지 않으면
DOMException에러 발생
1
2
3
4
5
6
7
8
9
10
11
12
13
14
15
16
17
18
19
20
21
22
23
  <!DOCTYPE html>
  <html>
    <body>
      <div>test</div>
      <ul id="fruits">
        <li>Apple</li>
        <li>Banana</li>
      </ul>
    </body>
    <script>
      const $fruits = document.getElementById('fruits');

      // 요소 노드 생성
      const $li = document.createElement('li');

      // 텍스트 노드를 $li 요소 노드의 마지막 자식 노드로 추가
      $li.appendChild(document.createTextNode('Orange'));

      // 두 번째 인수로 전달받은 노드는 반드시 #fruits 요소 노드의 자식 노드이어야 한다.
      $fruits.insertBefore($li, document.querySelector('div'));
      // DOMException
    </script>
  </html>
- 그렇지 않으면
- 두 번째 인수의 노드가
null인 경우- 첫 번째 인수의 노드를 메서드를 호출한 노드의 마지막 자식 노드로 추가
- 즉
appendChild메서드처럼 동작
1
2
3
4
5
6
7
8
9
10
11
12
13
14
15
16
17
18
19
20
21
22
  <!DOCTYPE html>
  <html>
    <body>
      <ul id="fruits">
        <li>Apple</li>
        <li>Banana</li>
      </ul>
    </body>
    <script>
      const $fruits = document.getElementById('fruits');

      // 요소 노드 생성
      const $li = document.createElement('li');

      // 텍스트 노드를 $li 요소 노드의 마지막 자식 노드로 추가
      $li.appendChild(document.createTextNode('Orange'));

      // 두 번째 인수로 전달받은 노드가 null이면
  		// $li 요소 노드를 #fruits 요소 노드의 마지막 자식 노드로 추가
      $fruits.insertBefore($li, null);
    </script>
  </html>
39.6.6 노드 이동
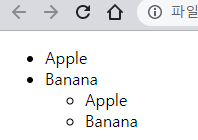
DOM에 이미 존재하는 노드를 appendChild 또는 insertBefore 메서드를 사용해 다시 추가하면 노드가 이동한다.
1
2
3
4
5
6
7
8
9
10
11
12
13
14
15
16
17
18
19
20
21
22
23
<!DOCTYPE html>
<html>
<body>
<ul id="fruits">
<li>Apple</li>
<li>Banana</li>
<li>Orange</li>
</ul>
</body>
<script>
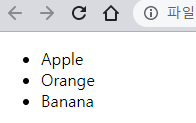
const $fruits = document.getElementById('fruits');
// 이미 존재하는 요소 노드를 취득
const [$apple, $banana, ] = $fruits.children;
// 이미 존재하는 $apple 요소 노드를 #fruits 요소 노드의 마지막 노드로 이동
$fruits.appendChild($apple); // Banana - Orange - Apple
// 이미 존재하는 $banana 요소 노드를 #fruits 요소의 마지막 자식 노드 앞으로 이동
$fruits.insertBefore($banana, $fruits.lastElementChild);
// Orange - Banana - Apple
</script>
</html>
39.6.7 노드 복사
Node.prototype.cloneNode([deep: true | false])메서드- 노드의 사본을 생성하여 반환
deep이true인 경우: 노드를 깊은 복사하여 모든 자손 노드가 포함된 사본 생성deep을 생략하거나false인 경우: 노드를 얕은 복사하여 텍스트 노드도 없는 노드 자신만의 사본 생성
1
2
3
4
5
6
7
8
9
10
11
12
13
14
15
16
17
18
19
20
21
22
23
24
<!DOCTYPE html>
<html>
  <body>
    <ul id="fruits">
      <li>Apple</li>
    </ul>
  </body>
  <script>
    const $fruits = document.getElementById('fruits');
    const $apple = $fruits.firstElementChild;

    // $apple 요소를 얕은 복사하여 사본을 생성. 텍스트 노드가 없는 사본이 생성된다.
    const $shallowClone = $apple.cloneNode();
    // 사본 요소 노드에 텍스트 추가
    $shallowClone.textContent = 'Banana';
    // 사본 요소 노드를 #fruits 요소 노드의 마지막 노드로 추가
    $fruits.appendChild($shallowClone);

    // #fruits 요소를 깊은 복사하여 모든 자손 노드가 포함된 사본을 생성
    const $deepClone = $fruits.cloneNode(true);
    // 사본 요소 노드를 #fruits 요소 노드의 마지막 노드로 추가
    $fruits.appendChild($deepClone);
  </script>
</html>
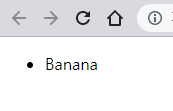
39.6.8 노드 교체
Node.prototype.replaceChild(newChild, oldChild)메서드newChild: 교체할 새로운 노드oldChild: 메서드를 호출한 노드의 자식 노드로 이미 존재하는, 교체될 노드
oldChild노드는 DOM에서 제거된다.
1
2
3
4
5
6
7
8
9
10
11
12
13
14
15
16
17
18
<!DOCTYPE html>
<html>
  <body>
    <ul id="fruits">
      <li>Apple</li>
    </ul>
  </body>
  <script>
    const $fruits = document.getElementById('fruits');

    // 기존 노드와 교체할 요소 노드를 생성
    const $newChild = document.createElement('li');
    $newChild.textContent = 'Banana';

    // #fruits 요소 노드의 첫 번째 자식 요소 노드를 $newChild 요소 노드로 교체
    $fruits.replaceChild($newChild, $fruits.firstElementChild);
  </script>
</html>
39.6.9 노드 삭제
Node.prototype.removeChild(child)메서드- 인수로 전달한 노드는 메서드를 호출한 노드의 자식 노드여야 한다.
1
2
3
4
5
6
7
8
9
10
11
12
13
14
15
<!DOCTYPE html>
<html>
  <body>
    <ul id="fruits">
      <li>Apple</li>
      <li>Banana</li>
    </ul>
  </body>
  <script>
    const $fruits = document.getElementById('fruits');

    // #fruits 요소 노드의 마지막 요소를 DOM에서 삭제
    $fruits.removeChild($fruits.lastElementChild);
  </script>
</html>
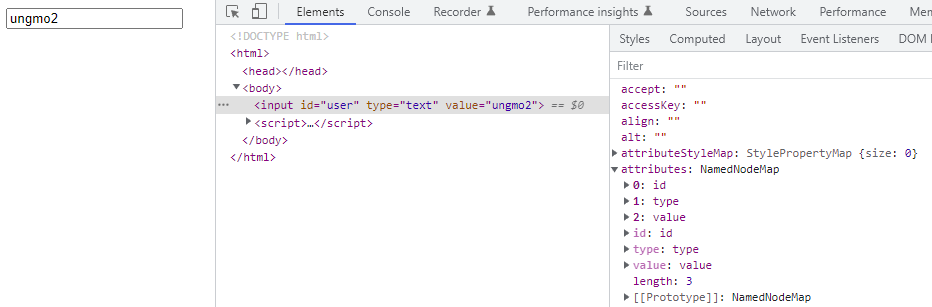
39.7 어트리뷰트
39.7.1 어트리뷰트 노드와 attributes 프로퍼티
- HTML 어트리뷰트
- HTML 요소의 동작을 제어하기 위한 추가 정보를 제공
- HTML 요소의 시작 태그(start/opening tag)에
어트리뷰트 이름=”어트리뷰트 값”형식으로 정의
1
  <input id="user" type="text" value="ungmo2">
- 어트리뷰트의 종류
- 글로벌 어트리뷰트
id,class,style,titile,lang,tabindex,draggable,hidden등- 모든 HTML 요소에서 공통으로 사용 가능
- 이벤트 핸들러 어트리뷰트
onclick,onchange,onfocus,onblur,oninput,onkeypress,onkeydown,onkeyup,onmouseover,onsubmit,onload등- 모든 HTML 요소에서 공통으로 사용 가능
- 특정 HTML 요소에만 사용할 수 있는 어트리뷰트도 존재
- 예)
type,value,checked어트리뷰트는input요소에만 사용 가능
- 예)
- 글로벌 어트리뷰트
- HTML 어트리뷰트는 HTML 문서가 파싱될 때 어트리뷰트 노드로 변환 → 요소 노드와 연결
- 어트리뷰트 노드의 참조는
NamedNodeMap객체에 담겨서 요소 노드의attributes프로퍼티에 저장NamedNodeMap객체: 유사 배열 객체이자 이터러블이며 요소 노드의 모든 어트리뷰트 노드의 참조가 담김
- 요소 노드의 어트리뷰트는
Element.prototype.attributes프로퍼티로 취득 가능attributes프로퍼티: getter만 존재하는 읽기 전용 접근자 프로퍼티이며NamedNodeMap객체 반환
1
2
3
4
5
6
7
8
9
10
11
12
13
14
15
16
17
18
  <!DOCTYPE html>
  <html>
  <body>
    <input id="user" type="text" value="ungmo2">
    <script>
      // 요소 노드의 attribute 프로퍼티는 요소 노드의 모든 어트리뷰트 노드의
  		// 참조가 담긴 NamedNodeMap 객체를 반환한다.
      const { attributes } = document.getElementById('user');
      console.log(attributes);
      // NamedNodeMap {0: id, 1: type, 2: value, id: id, type: type, value: value, length: 3}

      // 어트리뷰트 값 취득
      console.log(attributes.id.value); // user
      console.log(attributes.type.value); // text
      console.log(attributes.value.value); // ungmo2
    </script>
  </body>
  </html>
- 어트리뷰트 노드의 참조는
39.7.2 HTML 어트리뷰트 조작
Element.prototype.getAttribute/setAttribute메서드attributes프로퍼티를 통하지 않고 직접 HTML 어트리뷰트 값을 취득/변경 가능
- HTML 어트리뷰트 값 참조/변경
Element.prototype.getAttribute(attributeName)Element.prototype.setAttribute(attributeName, attributeValue)
1
2
3
4
5
6
7
8
9
10
11
12
13
14
15
16
17
  <!DOCTYPE html>
  <html>
  <body>
    <input id="user" type="text" value="ungmo2">
    <script>
      const $input = document.getElementById('user');

      // value 어트리뷰트 값을 취득
      const inputValue = $input.getAttribute('value');
      console.log(inputValue); // ungmo2

      // value 어트리뷰트 값을 변경
      $input.setAttribute('value', 'foo');
      console.log($input.getAttribute('value')); // foo
    </script>
  </body>
  </html>
- HTML 어트리뷰트 존재 확인/삭제
Element.prototype.hasAttribute(attributeName)Element.prototype.removeAttribute(attributeName)
1
2
3
4
5
6
7
8
9
10
11
12
13
14
15
16
17
18
  <!DOCTYPE html>
  <html>
  <body>
    <input id="user" type="text" value="ungmo2">
    <script>
      const $input = document.getElementById('user');

      // value 어트리뷰트의 존재 확인
      if ($input.hasAttribute('value')) {
        // value 어트리뷰트 삭제
        $input.removeAttribute('value');
      }

      // value 어트리뷰트가 삭제되었다.
      console.log($input.hasAttribute('value')); // false
    </script>
  </body>
  </html>
39.7.3 HTML 어트리뷰트 vs. DOM 프로퍼티
- DOM 프로퍼티
- HTML 어트리뷰트 값을 초깃값으로 가짐
setter와 getter 모두 존재하는 접근자 프로퍼티 ⇒ 참조/변경 가능
1
2
3
4
5
6
7
8
9
10
11
12
13
14
15
  <!DOCTYPE html>
  <html>
  <body>
    <input id="user" type="text" value="ungmo2">
    <script>
      const $input = document.getElementById('user');

      // 요소 노드의 value 프로퍼티 값을 변경
      $input.value = 'foo';

      // 요소 노드의 value 프로퍼티 값을 참조
      console.log($input.value); // foo
    </script>
  </body>
  </html>
- HTML 어트리뷰트의 역할
- HTML 요소의 초기 상태를 지정
변하지 않는다, 즉 요소 노드가 생성되어 첫 렌더링이 끝난 시점까지 어트리뷰트 노드의 어트리뷰트 값 = 요소 노드의 프로퍼티에 할당된 값 = HTML 어트리뷰트 값
1
2
3
4
5
6
7
8
9
10
11
12
13
14
15
  <!DOCTYPE html>
  <html>
  <body>
    <input id="user" type="text" value="ungmo2">
    <script>
      const $input = document.getElementById('user');

      // attributes 프로퍼티에 저장된 value 어트리뷰트 값
      console.log($input.getAttribute('value')); // ungmo2

      // 요소 노드의 value 프로퍼티에 저장된 value 어트리뷰트 값
      console.log($input.value); // ungmo2
    </script>
  </body>
  </html>
- 요소 노드는 상태(state)를 가지고 있다. ⇒ 사용자에 의해 변경된 최신 상태와 HTML 어트리뷰트로 지정한 초기 상태를 함께 관리해야 한다.
- 초깃값을 모른다면 웹 페이지를 처음 표시하거나 새로고침할 때 문제가 생긴다.
- HTML 어트리뷰트는 요소 노드의 초기 상태를 관리하고 DOM 프로퍼티는 요소 노드의 최신 상태를 관리한다.
어트리뷰트 노드
- HTML 어트리뷰트로 지정한 HTML 요소의 초기 상태 ⇒ 어트리뷰트 노드에서 관리
- 사용자 입력이 있어도 변하지 않고 초기 상태를 그대로 유지
- 어트리뷰트 노드가 관리하는 초기 상태 값 취득/변경
getAttribute/setAttribute메서드 사용
1
2
  // attributes 프로퍼티에 저장된 value 어트리뷰트 값을 취득한다. 결과는 언제나 동일하다.
  document.getElementById('user').getAttribute('value'); // ungmo2
setAttribute메서드- 어트리뷰트 노드에서 관리하는 초기 상태 값을 변경
1
2
3
4
5
6
7
8
9
10
  <!DOCTYPE html>
  <html>
  <body>
    <input id="user" type="text" value="ungmo2">
    <script>
      // HTML 요소에 지정한 어트리뷰트 값, 즉 초기 상태 값을 변경한다.
      document.getElementById('user').setAttribute('value', 'foo');
    </script>
  </body>
  </html>

DOM 프로퍼티
사용자가 입력한 최신 상태 관리
1
2
3
4
5
6
7
8
9
10
11
12
13
14
15
16
17
18
19
20
  <!DOCTYPE html>
  <html>
  <body>
    <input id="user" type="text" value="ungmo2">
    <script>
      const $input = document.getElementById('user');

      // 사용자가 input 요소의 입력 필드에 값을 입력할 때마다 input 요소 노드의
      // value 프로퍼티 값, 즉 최신 상태 값을 취득한다.
  		// value 프로퍼티 값은 사용자의 입력에 의해 동적으로 변경된다.
      $input.oninput = () => {
        console.log('value 프로퍼티 값', $input.value);
      };

      // getAttribute 메서드로 취득한 HTML 어트리뷰트 값,
  		// 즉 초기 상태 값은 변하지 않고 유지된다.
      console.log('value 어트리뷰트 값', $input.getAttribute('value'));
    </script>
  </body>
  </html>
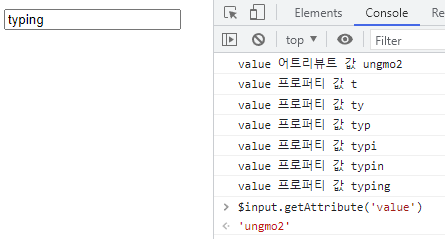
DOM 프로퍼티에 값을 할당해도 HTML 요소에 지정한 어트리뷰트 값은 영향받지 않는다.
1
2
3
4
5
6
7
8
9
10
11
12
13
14
15
16
17
  <!DOCTYPE html>
  <html>
  <body>
    <input id="user" type="text" value="ungmo2">
    <script>
      const $input = document.getElementById('user');

      // DOM 프로퍼티에 값을 할당하여 HTML 요소의 최신 상태를 변경한다.
      $input.value = 'foo';
      console.log($input.value); // foo

      // getAttribute 메서드로 취득한 HTML 어트리뷰트 값,
  		// 즉 초기 상태 값은 변하지 않고 유지된다.
      console.log($input.getAttribute('value')); // ungmo2
    </script>
  </body>
  </html>
사용자 입력에 의한 상태 변화와 관계있는 DOM 프로퍼티만 최신 상태 값을 관리한다.
id어트리뷰트와id프로퍼티는 사용자 입력과 관계없이 동일한 값을 유지 ⇒id어트리뷰트 값이 변하면id프로퍼티 값도 변하고 반대도 마찬가지1 2 3 4 5 6 7 8 9 10 11 12 13 14 15
<!DOCTYPE html> <html> <body> <input id="user" type="text" value="ungmo2"> <script> const $input = document.getElementById('user'); // id 어트리뷰트와 id 프로퍼티는 사용자 입력과 관계없이 항상 동일한 값으로 연동 $input.id = 'foo'; console.log($input.id); // foo console.log($input.getAttribute('id')); // foo </script> </body> </html>
사용자 입력과 관계없는 어트리뷰트와 DOM 프로퍼티는 항상 동일한 값으로 연동
HTML 어트리뷰트와 DOM 프로퍼티의 대응 관계
- 대부분 HTML 어트리뷰트는 같은 이름의 DOM 프로퍼티와 1:1로 대응하지만, 예외도 있다.
id 어트리뷰트 - id 프로퍼티는 1:1 대응- 동일한 값으로 연동
- input 요소의
value 어트리뷰트 - value 프로퍼티는 1:1 대응- value 어트리뷰트는 초기 상태, value 프로퍼티는 최신 상태
class 어트리뷰트 - className, classList 프로퍼티대응for 어트리뷰트 - htmlFor 프로퍼티는 1:1 대응- td 요소의 colspan 어트리뷰트는 대응하는 프로퍼티가 없다.
- textContent 프로퍼티는 대응하는 어트리뷰트가 없다.
- 어트리뷰트 이름은 대소문자를 구분하지 않지만 대응하는 프로퍼티 키는 카멜 케이스를 따름
- 예)
maxlength→maxLength
- 예)
DOM 프로퍼티 값의 타입
getAttribute메서드로 취득한 어트리뷰트 값은 언제나 문자열- DOM 프로퍼티로 취득한 최신 상태 값은 문자열이 아닐 수 있다.
예)
checkout요소의checked어트리뷰트 값은 문자열,checked프로퍼티 값은 불리언 타입이다.1 2 3 4 5 6 7 8 9 10 11 12 13 14 15
<!DOCTYPE html> <html> <body> <input type="checkbox" checked> <script> const $checkbox = document.querySelector('input[type=checkbox]'); // getAttribute 메서드로 취득한 어트리뷰트 값은 언제나 문자열이다. console.log($checkbox.getAttribute('checked')); // '' // DOM 프로퍼티로 취득한 최신 상태 값은 문자열이 아닐 수도 있다. console.log($checkbox.checked); // true </script> </body> </html>
39.7.4 data 어트리뷰트와 dataset 프로퍼티
- HTML 요소에 정의한 사용자 정의 어트리뷰트와 자바스크립트 간 데이터 교환을 위해 사용
data어트리뷰트data-접두사 다음 임의의 이름을 붙여 사용1 2 3 4 5 6 7 8 9
<!DOCTYPE html> <html> <body> <ul class="users"> <li id="1" data-user-id="7621" data-role="admin">Lee</li> <li id="2" data-user-id="9524" data-role="subscriber">Kim</li> </ul> </body> </html>
HTMLElement.dataset프로퍼티로 취득 가능
dataset프로퍼티DOMStringMap객체 반환DOMStringMap객체: HTML 요소의 모든data어트리뷰트 정보를 제공
DOMStringMap객체는data-접두사 다음 붙인 임의의 이름을 카멜 케이스로 변환한 프로퍼티를 갖는다.data어트리뷰트의 값을 취득/변경 가능1 2 3 4 5 6 7 8 9 10 11 12 13 14 15 16 17 18 19 20 21 22
<!DOCTYPE html> <html> <body> <ul class="users"> <li id="1" data-user-id="7621" data-role="admin">Lee</li> <li id="2" data-user-id="9524" data-role="subscriber">Kim</li> </ul> <script> const users = [...document.querySelector('.users').children]; // user-id가 '7621'인 요소 노드를 취득한다. const user = users.find(user => user.dataset.userId === '7621'); // user-id가 '7621'인 요소 노드에서 data-role의 값을 취득한다. console.log(user.dataset.role); // "admin" // user-id가 '7621'인 요소 노드의 data-role 값을 변경한다. user.dataset.role = 'subscriber'; // dataset 프로퍼티는 DOMStringMap 객체를 반환한다. console.log(user.dataset); // DOMStringMap {userId: "7621", role: "subscriber"} </script> </body> </html>
존재하지 않는 이름을 사용하여 값을 할당하면 케밥 케이스로 변경된 이름으로
data어트리뷰트가 추가된다.1 2 3 4 5 6 7 8 9 10 11 12 13 14 15 16 17 18 19 20 21 22 23
<!DOCTYPE html> <html> <body> <ul class="users"> <li id="1" data-user-id="7621">Lee</li> <li id="2" data-user-id="9524">Kim</li> </ul> <script> const users = [...document.querySelector('.users').children]; // user-id가 '7621'인 요소 노드를 취득한다. const user = users.find(user => user.dataset.userId === '7621'); // user-id가 '7621'인 요소 노드에 새로운 data 어트리뷰트를 추가한다. user.dataset.role = 'admin'; console.log(user.dataset); /* DOMStringMap {userId: "7621", role: "admin"} -> <li id="1" data-user-id="7621" data-role="admin">Lee</li> */ </script> </body> </html>
39.8 스타일
39.8.1 인라인 스타일 조작
HTMLElement.prototype.style프로퍼티- setter와 getter 모두 존재하는 접근자 프로퍼티
- 요소 노드의 인라인 스타일을 취득/추가/변경
1
2
3
4
5
6
7
8
9
10
11
12
13
14
15
16
17
18
19
20
<!DOCTYPE html>
<html>
<body>
  <div style="color: red">Hello World</div>
  <script>
    const $div = document.querySelector('div');

    // 인라인 스타일 취득
    console.log($div.style); // CSSStyleDeclaration { 0: "color", ... }

    // 인라인 스타일 변경
    $div.style.color = 'blue';

    // 인라인 스타일 추가
    $div.style.width = '100px';
    $div.style.height = '100px';
    $div.style.backgroundColor = 'yellow';
  </script>
</body>
</html>
CSSStyleDeclaration타입의 객체 반환CSSStyleDeclaration객체는 다양한 CSS 프로퍼티에 대응하는 프로퍼티를 가진다.
CSSStyleDeclaration객체의 프로퍼티- 값을 할당하면 인라인 스타일로 HTML 요소에 추가/변경
카멜 케이스를 따른다.
1
  $div.style.backgroundColor = 'yellow';
케밥 케이스를 그대로 사용하려면 대괄호 표기법을 사용한다.
1
  $div.style['background-color'] = 'yellow';
단위 지정이 필요한 프로퍼티에 단위를 생략하면 CSS 프로퍼티는 적용되지 않는다.
1
  $div.style.width = '100px';
39.8.2 클래스 조작
자바스크립트에서 class는 예약어기 때문에 class 어트리뷰트에 대응하는 DOM 프로퍼티는 class가 아니라 className과 classList다.
className
Element.prototype.className프로퍼티- setter와 getter 모두 존재하는 접근자 프로퍼티
- HTML 요소의
class어트리뷰트 값을 취득/변경- 요소 노드의
className프로퍼티 참조 →class어트리뷰트 값을 문자열로 반환 - 요소 노드의
className프로퍼티에 문자열 할당 → 할당한 문자열로class어트리뷰트 값 변경
1 2 3 4 5 6 7 8 9 10 11 12 13 14 15 16 17 18 19 20 21 22 23 24 25
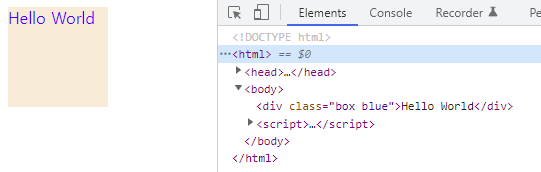
<!DOCTYPE html> <html> <head> <style> .box { width: 100px; height: 100px; background-color: antiquewhite; } .red { color: red; } .blue { color: blue; } </style> </head> <body> <div class="box red">Hello World</div> <script> const $box = document.querySelector('.box'); // .box 요소의 class 어트리뷰트 값을 취득 console.log($box.className); // 'box red' // .box 요소의 class 어트리뷰트 값 중에서 'red'만 'blue'로 변경 $box.className = $box.className.replace('red', 'blue'); </script> </body> </html>
- 요소 노드의
- 공백으로 구분된 클래스를 문자열로 반환하므로 사용하기 불편하다.
classList
Element.prototype.classList프로퍼티- class 어트리뷰트 정보를 담은
DOMTokenList객체 반환 DOMTokenList객체- class 어트리뷰트 정보를 나타내는 컬렉션 객체
- 유사 배열 객체이면서 이터러블
1
2
3
4
5
6
7
8
9
10
11
12
13
14
15
16
17
18
19
20
21
22
23
24
25
26
27
28
  <!DOCTYPE html>
  <html>
  <head>
    <style>
      .box {
        width: 100px; height: 100px;
        background-color: antiquewhite;
      }
      .red { color: red; }
      .blue { color: blue; }
    </style>
  </head>
  <body>
    <div class="box red">Hello World</div>
    <script>
      const $box = document.querySelector('.box');

      // .box 요소의 class 어트리뷰트 정보를 담은 DOMTokenList 객체를 취득
      // classList가 반환하는 DOMTokenList 객체는 HTMLCollection과 NodeList와 같이
      // 노드 객체의 상태 변화를 실시간으로 반영하는 살아 있는(live) 객체다.
      console.log($box.classList);
      // DOMTokenList(2) [length: 2, value: "box blue", 0: "box", 1: "blue"]

      // .box 요소의 class 어트리뷰트 값 중에서 'red'만 'blue'로 변경
      $box.classList.replace('red', 'blue');
    </script>
  </body>
  </html>
DOMTokenList객체 메서드add(...className)- 인수로 전달한 1개 이상의 문자열을
class어트리뷰트 값으로 추가
1
2
  $box.classList.add('foo'); // -> class="box red foo"
  $box.classList.add('bar', 'baz'); // -> class="box red foo bar baz"
- 인수로 전달한 1개 이상의 문자열을
remove(...className)- 인수로 전달한 1개 이상의 문자열과 일치하는 클래스를
class어트리뷰트에서 삭제 - 일치하는 클래스가 없으면 에러 없이 무시
1
2
3
  $box.classList.remove('foo'); // -> class="box red bar baz"
  $box.classList.remove('bar', 'baz'); // -> class="box red"
  $box.classList.remove('x'); // -> class="box red"
- 인수로 전달한 1개 이상의 문자열과 일치하는 클래스를
item(index)- 인수로 전달한
index에 해당하는 클래스를class어트리뷰트에서 반환
1
2
  $box.classList.item(0); // -> "box"
  $box.classList.item(1); // -> "red"
- 인수로 전달한
contains(className)- 인수로 전달한 문자열과 일치하는 클래스가
class어트리뷰트에 포함되었는지 확인
1
2
  $box.classList.contains('box');  // -> true
  $box.classList.contains('blue'); // -> false
- 인수로 전달한 문자열과 일치하는 클래스가
replace(oldClassName, newClassName)class어트리뷰트에서 첫 번째 인수의 문자열을 두 번째 인수의 문자열로 변경
1
  $box.classList.replace('red', 'blue'); // -> class="box blue"
toggle(className[, force])class어트리뷰트에 인수로 전달한 문자열과 일치하는 클래스가 존재하면 제거, 존재하지 않으면 추가1 2
$box.classList.toggle('foo'); // -> class="box blue foo" $box.classList.toggle('foo'); // -> class="box blue"
두 번째 인수로 전달한 조건식의 평가 결과가
true이면 강제로 추가,false이면 강제로 제거1 2 3 4
// class 어트리뷰트에 강제로 'foo' 클래스를 추가 $box.classList.toggle('foo', true); // -> class="box blue foo" // class 어트리뷰트에서 강제로 'foo' 클래스를 제거 $box.classList.toggle('foo', false); // -> class="box blue"
- 이외에도
forEach,entries,keys,values,supports등의 메서드를 제공
39.8.3 요소에 적용되어 있는 CSS 스타일 참조
window.getComputedStyle(element[, psedu])메서드element로 전달된 요소 노드에 적용된 평가된 스타일을CSSStyleDeclaration객체에 담아 반환- 평가된 스타일(computed style): 요소 노드에 적용된 모든 스타일(링크 스타일, 임베딩 스타일, 인라인 스타일, 자바스크립트에서 적용한 스타일, 상속된 스타일, 기본 user agent 스타일 등)이 조합되어 최종적으로 적용된 스타일
1
2
3
4
5
6
7
8
9
10
11
12
13
14
15
16
17
18
19
20
21
22
23
24
25
26
27
28
29
30
31
32
33
34
35
36
37
38
39
  <!DOCTYPE html>
  <html>
  <head>
    <style>
      body {
        color: red;
      }
      .box {
        width: 100px;
        height: 50px;
        background-color: cornsilk;
        border: 1px solid black;
      }
    </style>
  </head>
  <body>
    <div class="box">Box</div>
    <script>
      const $box = document.querySelector('.box');

      // .box 요소에 적용된 모든 CSS 스타일을 담고 있는
  		// CSSStyleDeclaration 객체를 취득
      const computedStyle = window.getComputedStyle($box);
      console.log(computedStyle); // CSSStyleDeclaration

      // 임베딩 스타일
      console.log(computedStyle.width); // 100px
      console.log(computedStyle.height); // 50px
      console.log(computedStyle.backgroundColor); // rgb(255, 248, 220)
      console.log(computedStyle.border); // 1px solid rgb(0, 0, 0)

      // 상속 스타일(body -> .box)
      console.log(computedStyle.color); // rgb(255, 0, 0)

      // 기본 스타일
      console.log(computedStyle.display); // block
    </script>
  </body>
  </html>
pseud: 의사 요소를 지정하는 문자열- 의사 요소가 아닌 일반 요소의 경우 생략
1
2
3
4
5
6
7
8
9
10
11
12
13
14
15
16
17
18
19
20
  <!DOCTYPE html>
  <html>
  <head>
    <style>
      .box:before {
        content: 'Hello';
      }
    </style>
  </head>
  <body>
    <div class="box">Box</div>
    <script>
      const $box = document.querySelector('.box');

      // 의사 요소 :before의 스타일을 취득한다.
      const computedStyle = window.getComputedStyle($box, ':before');
      console.log(computedStyle.content); // "Hello"
    </script>
  </body>
  </html>
- HTML 요소에 적용된 모든 CSS 스타일을 참조할 경우 사용
39.9 DOM 표준
- 과거에 HTML과 DOM 표준은 W3C(World Wide Web Consortium)과 WHATWG(Web Hypertext Application Technology Working Group)에서 협력하며 만들어 왔다.
- 두 단체가 다른 결과물을 내놓기 시작해 WHATWG이 단일 표준을 내놓기로 합의했다.
- WHATWG는 애플, 구글, 마이크로소프트, 모질라가 주도한다.
- DOM 현재 4개의 레벨이 있다.
- DOM Level 1 ~ DOM Level 4